There is an old saying, "Red sky in morning, sailors take warning. Red sky at night, sailors delight."
A red sky at night (supposedly) predicts fair weather for the following day. So I hope this lovely evening sky means tomorrow will be a nice one. It was breezy and mostly cloudy today and felt colder than the temperature indicated.
Work around the homestead seldom spreads itself out evenly. Seems like things all happen at the same time and you are caught trying to juggle many tasks in too little time. Sugaring season overlaps with early garden season, overlaps with mud season and the need for special attention to animal deep bedding maintenance.... Each of these things are above and beyond the normal household tasks and they all have to get done. The last couple of days have been like that. Whew!
So it is good today to have a sort of catch up day. Getting several household tasks and errands done felt good, plus a nice 2 hour run.
But it seems like another sap boiling day will be shortly on the horizon, as the trees are running like mad. Today I gathered 15 gallons of sap - the most ever on a single day. One of the buckets was full to the brim and almost overflowing. Lugging 5 gallon buckets full of sap through the spring soft snow is no small feat. I reckon the buckets weigh close to 40 pounds.
I needed to make a decision about the chicks also. They have simply outgrown their crate. But with weather still quite cold, especially overnight, they can't just be put outside with no protection. And they cannot yet mix with the grown hens. I believe I have a solution, and tomorrow will be moving day for them! You will be amazed at how much they have grown. And I will be glad to get their mess (and smell!) out of the house.
So, now is the end of a nice catch up day.. I think I will sit with a cup of hot tea and read a chapter in my book. Or maybe I should save that for the next boiling day!
Our first batch! 6 sealed jars, and a "dregs"jar for us to use now. It was the last of the syrup and i squeezed the filter to get every bit possible.
Finishing the syrup involves boiling down that last little bit to get the sugar concentration just right. Doing this over a variable wood fire is hard, so generally, the finishingnis done over a controlled heat, lkke your kitchen stove, or a propane cooker outside. I am doing small batches in the kitchen, as it is snowing again today and cold.
Getting the boil going.
Jars And lids. I will sterilize these while the syrup boils.
My filter. This is a clean 100%cotton, lint free flour sack towel.
Almost there. The syrup has to reach 220 degrees.
Things happen fast at this point, and close supervision is necessary.
Finished syrup in the filter.
After the syrup finally reaches temperature, it nedds to be filtered. There are minerals called "sugar sand" that occur naturally, and for a nice clear syrup, you want to filter these out. There are special syrup filters that cost about $22. they are thick, either wool or orlon, and with our small batches,nit seemed like I would lose alot of syrup innthe filter. So, I used a good, 100% cotton flour sack towel. It seems to do just fine. The syrup is crystal clear. So thats the first fruits of labor. It is pretty darn cool to harvest this great natural resource from our property. I am hoping to
finish off the rest of what I boiled yesterday. Two or three more batches this size.
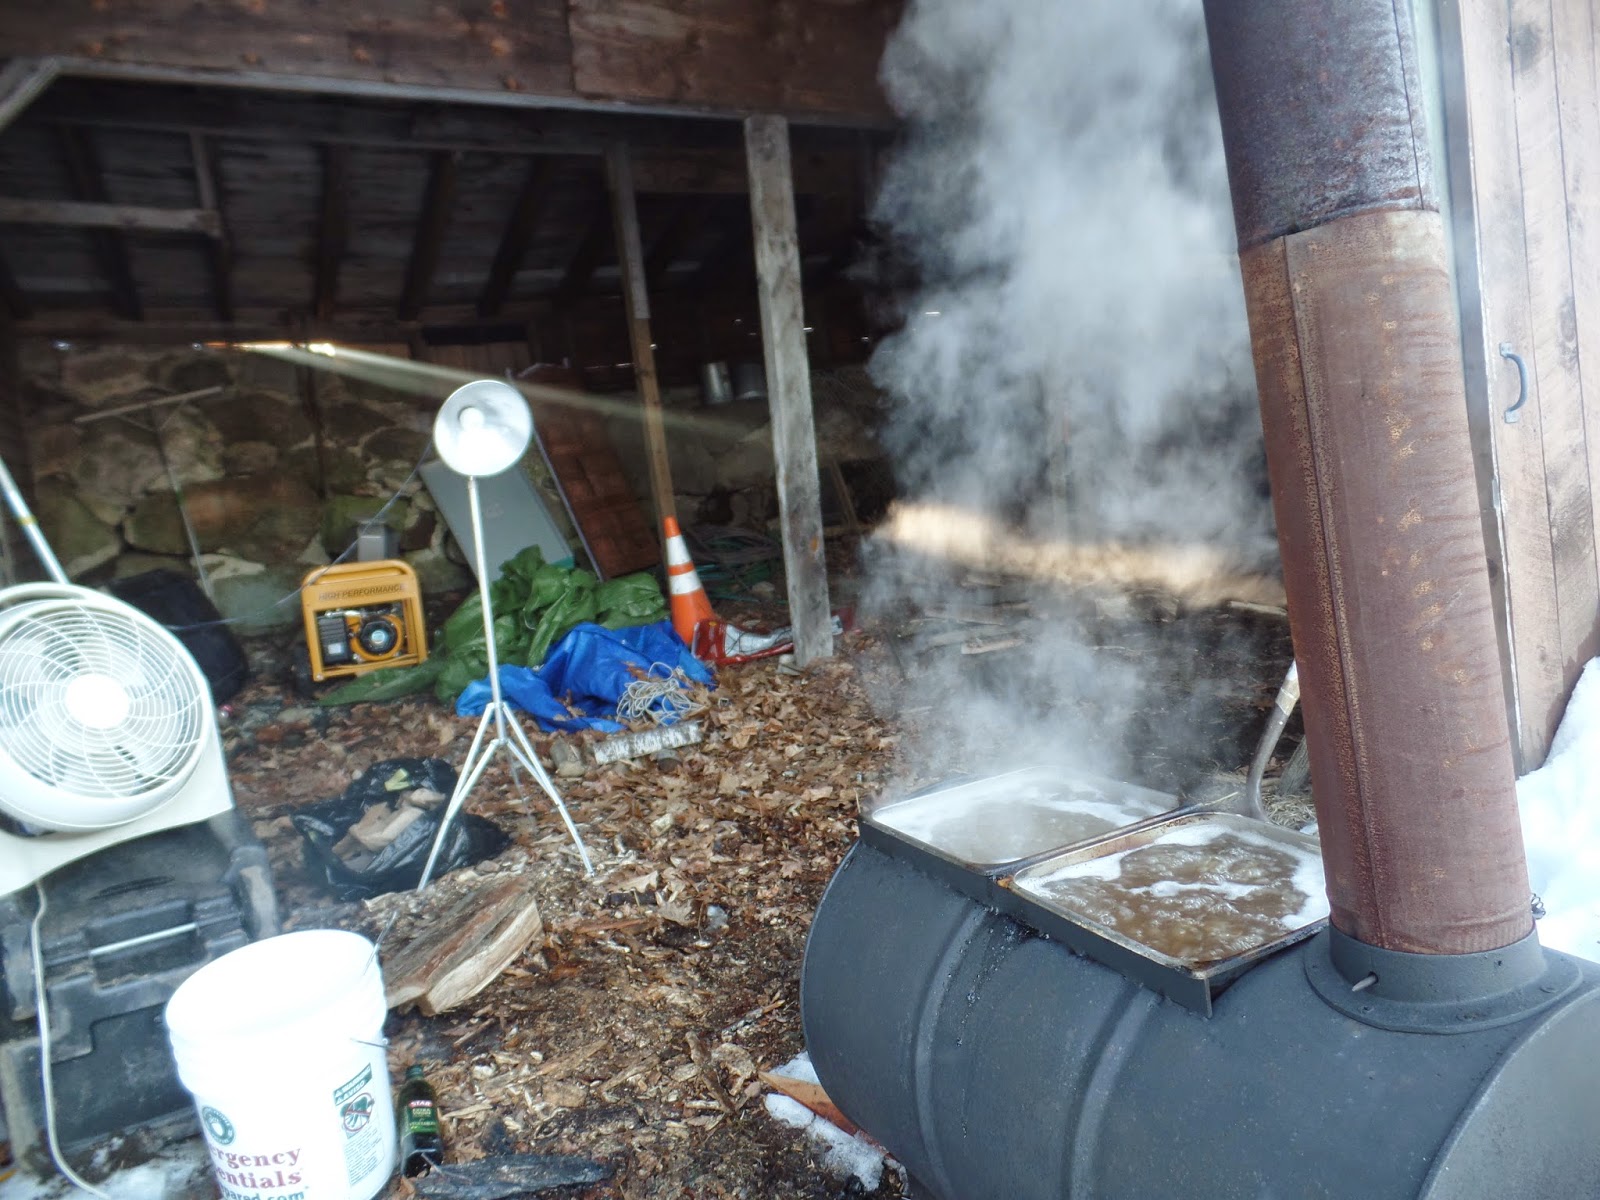
Today was the first of (probably) several sessions of boiling down all the sap I am collecting from our maple trees. This is a long process, but it was a picture perfect day today and I didn't mind being out there.
I gathered all the supplies (a chair, a cup of coffee, a book, my tablet)... Oh, and of course, got the evaporator, plenty of firedwood, and the sap.
A beautiful day to boil sap!
This is looking inside the 55 gallon drum where the sap has been stored. In our recent below zero temperatures, it froze. I had to chip away a hole in the center to get at the unfrozen part. This freezing actually helps concentrate the sap a bit more, because the ice is really just plain water, and what's unfrozen has a slightly higher sugar content. It makes for a bit less boiling. I estimated there is 50-60 pounds of ice in this barrel. It felt more like 150 when I tried to move it.
Get a good roaring fire going.
The process is pretty straightforward, at least for the first 8 hours. Pour the raw sap into the shallow trays on top of the burner, and boil away. Keep adding more sap as it slowly evaporates and the levels in the pan drop.. Don't let it get too low, and if it starts to foam or boil over, a tiny drop of olive oil or butter will prevent that from happening. Keep the fire as hot as you can. Any kind of wood can be used. Scrap lumber, whatever. Pine is good because it burns hot and fast. We had lots of scrap pine.
What you are doing is taking a solution with about 2-3% sugar, and boiling away the excess water, to concentrate it down to a 67% sugar solution. So we are talking LOTS of evaporation that has to happen.
As the sap cooks, it changes from a clear, water-like liquid, into an increasingly amber colored and thicker
one. After awhile, you can begin to smell that maple sugar aroma. Mmmmmmm.
Although I brought out a book, my tablet, a cup of coffee and a chair with me, I don't think I sat down for more than 10 minutes all day, and only got one page of my book read. There was just stuff that needed doing. I split the pine boards we were burning, so they would burn better. I had to shovel off the snow on the roof of the shed because it was melting and dripping right into the sap pan! I had to go make the rounds twice to gather more sap from the buckets (its like job security, those trees just keep pumping out the sap!) I set up my small Rocket Stove to pre-warm the sap so that it didn't slow the boil down so much when I had to add extra to the pans.
And then there was lunch, and the neighbors came by, and , well, before you know it, the day has gone by and we are still boiling. I say "we" - it was just me out there, but I guess I count the dogs and chickens. Steve was at a 20 mile road race today, or I'm sure he would have been here helping. I was supposed to go, but hey, sap doesn't wait! This had to happen today.
I don't know why this picture insists on being sideways. I am just showing that it's now late afternoon and the moon has come out.
The last rays of daylight silhouette my best-producing maple tree.
It's late enough that the Chickens have gone to roost. Their main roost is an old orchard ladder . The boss hen gets to have the highest spot. See her? Doesn't she look bossy?
A shaft of late-day sunlight seems to focus right on the evaporator and the cloud of steam rising.
As things get closer to being done, I have to monitor the temperature closely. I want to take the "almost syrup" off the stove here when it reaches 217 F. The actual goal is 219-220, but that can happen really fast, and it's easy to burn the syrup, so that last bit of boiling will be done over a controlled heat.
It rained all night last night. We lost power for several hours, but it was back on when we woke up this morning. The rain changed to snow after dawn, and continued lightly for about an hour. Now the temperatures are rising (high 30's) and the warm air hitting the snow on the ground creates what we call "snow fog" - a low mist that settles over the ground everywhere. Sometimes rather eeire, sometimes quite lovely.
Everywhere the snow is melting, and bare patches are beginning to pop up here and there, mostly around the edges of the snowbanks. And, anywhere there is bare dirt, it is MUD. Here in New Hampshire, we have a whole season devoted to mud. It's a short season, perched somewhere between the snow melt of late winter and the real beginning of spring. We plan around it. We say things like, "Once mud season is over, we can get the tractor out."
or, "When mud season hits, I know it is time to plant the lettuce in the cold frames."
Things that DONT happen in mud season:
clean cars
clean floors
clean dogs
clean dry work boots.
Mud season is the enemy of any animal enclosure. It is not good for ANY critter to have to stand around in mud. So the homesteader has to provide some dry mulch to keep animals out of the mud as much as possible. Its an every day chore. A single milk cow might need 50 pounds of hay or straw every day laid down in her pen. Since we are are only dealing with chickens right now, my quantities are not that drastic, but I still have to fork out and spread some straw in their run. The last two days I have not let them out because I am away working and cant' keep an eye on them. Plus, it has been raining and they are not always smart enough to get out of the weather. I just try to keep as dry a layer on top as possible so they are not constantly walking around with wet feet. I wouldn't like that either if I were them.
But, don't get me wrong. We welcome mud season, as it is the signal that long awaited spring is finally coming. All of a sudden, on a sunny day in late March, you just might walk outside and smell EARTH... that wonderful, composty, sweet, pungent smell of beautiful beautiful dirt and all the life within it. After a long winter, THAT is something to cherish.
I have been working all week, filling in for a friend at a gallery, while she is off gallivanting in France or some such place. So, not much work has gotten done around here. But i did do a much-needed cleaning of the chicks cage today. I moved a few things around, removed one of the heating units, as they don't need it so much and it takes up space their growing selves can use now. It's been about 15 minutes and they have already made a total mess of the clean cage.
The clean litter seems to awaken their scratching and pecking instincts, and they toss pine shavings everywhere in their frantic search for something under the litter.
Even more, the clean soft litter brings out their desire to have a bath. Chickens bath with dirt. This is an important part of keeping them healthy, actually, as it is how they rid themselves of excess skin oils, feather mites and other parasites. If you have ever seen a chicken taking a dust bath, it is pretty funny, and they look about as content as you could ever hope to see.
No, they're not dead, they are enjoying a nice dust bath.
The chicks do this too. Only, with 26 of your brothers and sisters all crowding in and stepping on you as you try to bathe, well, it's not quite as easy as you might think.
So, today's chick flick is watching some of the dust bathing activity. Day 17 Hey, I Am Trying to Take a Bath Here.....
Sometimes March can be sort of a limbo month for the garden. We are having a late spring, with below average temperatures. But any day now, the weather could suddenly turn to spring, so things have to be ready. Our garden here is in no way ready.. so all this preparation sometimes feels like a gamble. Still, seeing the seedlings poking up through the soil, even if it is the inside grow shelves, is good winter therapy.
Here is a link for a free online gardening summit... about 30 experts in the field of sustainable, organic, homegrown food production will present videos on every conceivable aspect of growing your own groceries. Things like:how much land do you need? What are the best chicken breeds? What are some ways to collect rainwater? raising small livestock, growing herbs for natural cures, eating for health, anf many more.
its all free, and i think it is going to be a wealth of information. http://homegrownfoodsummit.com/
And here is Day 16 of the Chick Flicks...there wasnt a day 15.
The chicks are beginning to look like small chickens, instead of cute fluffy babies. They are also outgrowing the crate very quickly and I am scrambling to find a larger, safe space for them. They may take a short visit to the outside soon.
notice innthe video, towards the end, the little rooster chick with NO TAIL while all the little girls have very obvious tail feathers.
Finally, we had a day with temperatures above freezing. Even though the day started at 5 degrees, the sun came out and warmed things up. It was delightful.
the new sap buckets. These traditional buckets are courtesy of a kind neighbor who had extra. And they do look nice. Thanks to the warmer temps, I gathered about 9 gallons of sap today.
Meanwhile, the cold frames are warming up, and i even saw a couple of sprouts beginning to poke their heads out of the dirt.
We are back to single digits at night and only low 20's in the daytime. It has really felt cold because these temps have been accompanied by wind. Brrrrr...
So, there has been no sap flow for about the last 5 days. And believe it or not, the 40-something gallons of sap in my collection barrel have frozen solid. I actually had planned to do a boil today since I have collected enough to make about a gallon of sap. But, I guess I will have to wait till it thaws. It's not BAD that it froze. This keeps it fresh. But it DOES inconvenience me, and forces me to wait till most of it is thawed out.
The native Americans actually used the freezing technique to concentrate the sap. If you freeze it, then allow about 2/3 of it to thaw out, what ice is left is almost all just plain water. The thawed portion is now a slightly stronger sugar solution. You can do this freeze-thaw several times and get a more concentrated sap to start the boil, but the taste and texture of maple syrup requires heat application in the end.
I had some computer issues so there is not a post from yesterday. so here are two days of Chick Flicks.
So, first day of spring, and we woke to snow. Just a few inches fell. And at one point,the sun even came out. We decided to go for a long winter hike, and brought the dogs with us. It was nice. Rough going in some places through the still-deep snow, but still mostly quite enjoyable. We saw many signs of moose,but never caught a glimpse of one.
Back home and back to chores. We were surprised by a neighbor bringing over some REAL sap buckets... you know, the metal kind that look so nice. That was really nice because my plastic ones are a little sad.
I am going to go out and exchange them very soon.
Meanwhile.....
My growing shelves in the house have reached capacity. so now what?
Maybe this is a sign that I need to wait to plant more seedlings.
Surely not. I bet i can find more window space!
Right now, the hardy greens are seeded in flats in the cold frames. That is spinach, kale, chard, parsley, and two different kinds of lettuce, and several varieties of cabbage. .Holding my breath to see when they will sprout. Its been 11 -15 degrees at night. If these were already up and growing, I would be concerned. But seeds naturally go through some freeze/thaw cycles if left out over winter, so I think they will be ok.
Inside, there are a couple hundred onion seedlings, and flats of tomatoes, peppers, celery, broccoli, and cauliflower. Everything is up except the peppers. They are being slow.
If the cold frames had been prepared before winter, I would be planting carrots in them. I will have to miss this first early planting and hope I can make up for it with late crops in the fall.
Broccoli and Tomatoes . In the very front are the tiny celery seedlings popping through.
a few of the 200 onions.
Ahhh... it is nice just seeing these plant babies pop up through the soil... Garden therapy!
The chicks were crazy wild today. I think they would like to get out of that crate. Maybe I can fix up some larger "playpen" area. Oh, the floor would suffer! So here is Day 12 video. I call it "Chick Rush"... what happens when you put a treat inside a cage with a couple dozen baby chicks! The greedy little buggers!
In a word, No. At least, most likely "No." There are some systems that you can develop that can feed the flock to a great degree without having to buy commercial feed. We will be talking about some of those systems later. I am working to develop one here on our Homestead.
But, in reality, chicken you buy in the grocery store is cheap because of the way the animals are raised.
That's a topic for another post.
But, for those who decide they might want to raise their own backyard chickens for eggs and/or meat, the real question is not, "is it cheaper?" but rather "why do I want to do this?" For most, the answer is something like "Because I want to know where my food comes from, and have control over how it is produced."
Any reasonable person might question whether they want to continue to purchase these mass-produced, grocery store products. For those concerned about GMO's, (Genetically Modified Organism) understand that commercially raised chicken (and just about every other animal raised for meat) are fed vast quantities of GMO corn and soy. That is the basis of almost every poultry food out there. or pig ration. Or Cattle Feed. Or Turkey Feed. You get my drift....Besides the questionable long-term safety of GMO;s, what comes WITH those GMO is extremely high percentages of the pesticide Roundup. The GMO corn was developed to withstand this pesticide, so that farmers can spray the entire fields, drenching them with this herbicide (which is, if you want to know, basically the same as Agent Orange from Vietnam fame) . Every weed or other plant dies, and it makes it easier to grow the corn. The active ingredient in Roundup, Glyphosate has been shown to have some very detrimental effects on human life and health.
Consider: Is Glyphosate Safe?
and: Roundup Ready Soy
and this: Glyphosate and Autism
So, with all the indications that chicken (and thus eggs) produced commercially are not the healthy choice you may have been led to believe, despite those commercials showing green farm fields and happy animals, then the choice to grow your own begins to make more and more sense.
So, it may not be cheaper to raise your own (there ARE ways to mitigate costs) it might just be the best thing you can do for your family. This goes for vegetables too, by the way.
But, for those who want an idea, here's some breakdown in costs. Let's say you want to raise 6 laying hens.
chicks: This is a bigger expense than you might think. Day old chicks from the hatchery cost around $3.00 apiece. If you purchase "straight run", which is just chicks out of the incubator with no testing for gender, they are a little cheaper, but you will end up with approximately 50% roosters. If you are growing for food, then that might be okay. But if you want layers for eggs, you will need to order pullets (females) and that's a bit more expensive. Pullet chicks: $18.00 plus shipping.(which could be $20) If you buy from a hatchery, there is usually a minimum order of at least 15. So you will have to get these from a local feed store or other if you only want six. You might pay $4 each in that case. heat lamp - from $10 - $80 depending on what you get. You will add in some electricity costs as well.
Crate or cage to keep babies in - this doesn't have to be fancy. Could be a big box, or a plastic tote, or a wire dog crate. Food and water dishes. Also, can purchase poultry specific dishes, or just use some shallow pans and bowls from the kitchen. so anywhere from $0- maybe $60, especially if you get full size automatic waters or feeders. A coop for the grown hens, plus fencing if you want to keep them safe from predators like the neighborhood dogs, coyotes, foxes, hawks, and even bears. Again, you can spend alot of money for one of these, or build your own out of scrap lumber, or maybe find a used one on craigslist. Prices are all over the map here, but know that you need to provide a secure and safe shelter, watertight and windproof. from $0-$1200 Heated water dishes. If you live in a northern climate, I highly recommend one of these if you dont want to be chipping ice out of the bowl 3-4 times a day. $25-$50 Feed: This is the biggie. Especially considering that you will need to feed laying hens for 6 months before you see a single egg, and meat chickens for anywhere from 6 weeks to 3 months, depending on breed.
And, considering the above articles on GMO's and pesticides, you will likely want to buy organic feed.
That's going to run you about $35 for a 50 lb. bag.(could be even more, depending on brand) From the time they are chicks until they are grown (6 months) you are going to average 50 pounds in a month.. a little less obviously when they are small, and more when they are grown,but this is an average.
Feed cost: $35 x 6 = $210 before you ever see an egg.... Calcium - you need to provide some form of calcium - the usual is Oyster shells ground up. This isn't expensive, but count on $10 for a 5 pound bag, which will last you maybe 4-6 months, depending on what else your chickens eat, or if they have access to pasture.(ah, and that's the secret, which we will talk about later)
And, egg production goes way down after a couple of years, so some people decide to start over with a new brood of chicks....
So, you see this is not a cheap operation. And why you might now appreciate the price tag on those local organic eggs at the natural food market.
but what do you get in return? Eggs, wholesome and healthy. Wonderful manure for your garden. A way to dispose of all those kitchen scraps. No ticks in your yard! (if you free range them) A bug-free garden! (way to do this so they don't eat your PLANTS too) And free entertainment! hens are entertaining, no question. and peaceful, I call it "chicken therapy" - great way to de-stress is to walk down to the chicken yard, sit with a cup of tea or coffee and just watch. Feel your blood pressure go down. And a relationship with a living creature that teaches you, if you pay attention, alot about life in general and the natural world. and maybe most important of all. the knowledge that you are, in your small way, contributing to a healthier planet for the next generation, providing a good life for your birds, and feeding your family the best that you can provide. And that is no small matter. Day 11A The Chick Flicks - chicks in a box!
Today, I clean out the cage. At first, the chicks were very traumatized by being in the box. Then, they didn't want to leave. And yes, those are pajama pants I'm wearing. It's still morning! :-)
Day 11B - The Chick Flicks - a clean cage! And reluctant return!
The baby chicks have gotten all the attention lately, so I thought I would walk out and visit "the girls".
We walk out to the coop, check for eggs, and talk about chicken personality.
Today, I worked on a painting, and did very little "homestead" activities. I did check the temps in the cold frame, and even though it was 11 degrees last night, the cold frames were toasty. So, I am hopeful that things will start sprouting in there before long.
And here is Day 9 of the Chick Flicks. I talk about their food, going outside, (hint: not yet!) and see how big they are.
St. Patty's Day is traditionally celebrated with copious drinking corned beef and cabbage. We make a similar meal, with additional veggies, called New England Boiled Dinner. It is hearty, delicious, and full of
healthy vegetables. And, if you choose a grass-fed, organically and ethically raised piece of corned beef, then you can feel a little better about the meat component too.
First of all, what the heck is "corned beef"? It really is simply beef, usually brisket, which is brined, (soaked in a salt solution) with added spices and herbs. I have brined my own in the past, - it's not hard, and better, much better, than the usual store-bought variety which has all sorts of other nasty ingredients like nitrates, etc. that you just don't want.
It's an easy, one-pot meal. This is comfort food, which also happens to be full of healthy vegetables.
First: Simply take your brisket and put in a large pot with enough water to cover it about 2 inches.These usually come in a packet with some brine and the herbs and spices. Throw it all in the pot. Bring to a boil, then lower heat and simmer until the meat is fork tender. We chose a very small brisket for just the two of us.
fork tender corned beef brisket after cooking
When that is about done (might be several hours, depending on the size of your brisket)
gather your veggies. The traditional ones are onions, potatoes, turnips, carrots, and of course, cabbage. I have heard of folks adding parsnips, and, even, beets (though, those are cooked separately and added at serving time because they will color everything a freaky reddish pink)
I never have an exact amount of anything, but go for LOTS of them. This is the amount I put in for just the two of us. We do like these veggies as leftovers. I was wishing I had more turnips. One helpful tip is to try to find small onions, and keep them whole, or just cut in half, as they tend to fall apart and it's nice to have recognizable chunks of onion in the mix rather than just bits and pieces. I don't usually peel potatoes, but I do for this meal. Dont ask me why. I just do.
Cut them all up into larger pieces, like for stew. The cabbage I cut into quarters, and maybe a bit more, depending on how big it is.
The veggies. Yum.
Did you notice anything about the choice of vegetables? Every single one of them is a winter storage
vegetable. These are all things our great grandmothers would have had in the root cellar, still good at the end of winter, ready to be cooked and enjoyed. These old recipes had a seasonal rhythm to them that we tend to miss today, when we can get any vegetable or fruit in any time of the year, no matter that it had to
travel from halfway across the world. Don't get me started! This meal is a good example of the practicality of growing your own food, and especially these winter keeper vegetables.
Adding the veggies to the broth.
I take the meat out of the pot, and add all the vegetables in as I cut them up. I had so many, I had to switch to a bigger pot. If, like me, you go overboard with the vegetables, you might have to add a bit more water to cover everything.
Everything chopped up and in the pot
I add the meat back in. You don't have to.
Nothing wasted! The scraps all go to the freezer for eventual cooking into vegetable broth.
Ahh........ We like lots of mustard on ours.
Once the vegetables are done, it's time to eat! Slice the meat across the grain, and fill your plate! On a cold March day, I can't tell you how good this tastes. And all these vegetables are quite nutrient dense, with great immune boosting properties (just what you need to fight the flu season!) It goes well with a crusty piece of artisan bread, but I am mostly wheat-free these days, so we skipped that. You can have some though.
the perfect accompaniment
And of course, we need a Guinness!
And dont throw away the leftover broth! It makes MARVELOUS broth for cooking vegetables. Put in a container in the freezer for later.
Here is Day 8 of the Chick Flicks. I think I called it Day 7 in the video, but I hadn't had much coffee yet. ;-) I talk about real vs. processed foods, how that affects the chicken's health, and the same for us. And how real living food makes a difference in the quality of the eggs. And how much they like it. I also talk about a little runt chick that is doing fine, but just quite a bit smaller than the rest.
Day 8 Of Runts and Real Food.
Also, I checked the temperature in the cold frame this morning. It was 15 degrees out earlier, and when I checked I think it was maybe 21 outside. The temp inside was right under 40 degrees, maybe 39. It dropped fast once I took it out of the cold frame. So that's great. The seeds should be fine.
No, not a cabbage. A chick playing King of the Brooder. After watching today's chick flick, can you
tell me if this is a little cockerel or a pullet?
cabbages in the cold frame (sounds like that could be the name of a rock band) I have the used bubble wrap as an extra insulator, since my cold frames aren't set into the ground and have a few air gaps around the edges.
Today, I planted 43 pots of cabbage seeds in seed pots, and put them in the cold frame. Seems fitting on St. Patty's Day to be planting cabbages. Even better, this is one day of the year, we will have some meat, because St. Patty's Day without Corned Beef and Cabbage is just... wrong..... I was able to get a lovely small corned brisket, grass fed and organic, and just brined, no nitrates or other nasties.... It sure smells good in the kitchen right now.....
But I digress.... I selected 4 varieties of cabbage. They are all open pollinated, meaning they will produce seeds that are genetically like the parents, unlike hybrids. I want to save seeds from year to year, so must stick with open pollinated varieties.
I selected:
Copenhagen Market, and relatively fast grower and good for storage. Medium size round heads. (15)
Frigga Green Savoy - a pretty quick grower also. I like Savoy cabbage. It is beautiful in the garden too. (8)
Red Acres - an early red cabbage, medium size, good for storage. (12)
Cuor di Bue Grosso- these are new for me.. a conical shaped head, very sweet, good for fresh eating. (8)
I will be planting more, and will also do a direct seed in the garden later in the year.
Temperature inside the cold frame, even on a dark cloudy day and me lifting the lids to work And even with it getting down into the 20's at night. .
No need to worry much about these seeds, as the above photo demonstrates. The beauty of the cold frame is that it jumps the season by at least a month, maybe more like 6-8 weeks, by it's solar effect. Much like the inside of your car gets warm, even in winter, on sunny days, the cold frame absorbs the solar rays and warms up nice and toasty.
Very dirty sap trays
And now that the fun task is over, I will have to see what I can do with these trays that we will use for boiling the sap. I got some scrubbin' to do!!!!
Today is Day 7 of the Chick Flick... I talk about how to tell the gender of your little chicks. At this stage, when they are beginning to put out a few tiny pin feathers, there is a very simple, and surprisingly accurate, way to tell what sex they are. So, if you hatch out chicks at home, either in an incubator, or under a broody hen, here's how you can tell what you've got. You just have to wait about 10 days after hatching.
Day 7 Chick Flicks
Sap today : First buckets totaled about 3 gallons. I will do another check late in the day. Temps are in the 40's, cloudy and gray!
Here is a brief tour of our return to New Hampshire... random photos taken since we got here in October till today. Enjoy....
and here is Day 6 of the Chick Flicks.
They are darting around like crazy.... what's gotten into them? I talk about determining the sex of your chicks, which I hope to demonstrate tomorrow, when maybe it is a bit more obvious to show you.
This will be useful if you hatch out your own chicks, or have a broody hen hatching them out. You can get a very good idea of how many of each, rooster or pullet, you have in your brood. They also go for the green sprouts...
I am still pondering the garden... Still lots of planning to do, and how best to arrange everything. The garden is really the heart of the homestead. It's a big deal for us. I feel the pressure. :-)
It snowed a little more today, and the winds kicked up something fierce for awhile. However, I hear that tomorrow is going to be 45 degrees and sunny. That will be a nice change!
MAPLE UPDATE
Today's sap production was about 7 to 7 and 1/2 gallons. One tap in particular is producing almost zero. I don't know why, but I have decided that it is still early enough in the season to drill a new tap elsewhere, so I will pull that one and put it on another tree. The ziplock bags are working well.... it keeps most of the gnats and random bits of bark from falling into the sap, requiring me to filter before I dump it in the storage barrel. So far, the snow refrigeration is working great.
SEEDLINGS UPDATE
Not much to report. A few onions have started coming up. A couple of tomatoes, and the broccoli and cauliflower. None of the celery, which makes me think the seeds are no good. I am using the radiator by my growing shelves as a "heat mat" to help warm the soil for the new sprouts. Our house rarely gets above about 58 degrees, so that extra bit of warmth is appreciated by the seeds. I like to lean against the radiator too.
USING SPENT GRAINS FROM BREWING FOR FEED
Steve made beer last night, and had a whole five gallon bucket full of "spent grains". These would be the malted barley that is steeped to make the mash for the brew. Malted barley is simply barley grains, with hulls intact, that are sprouted, then dried. Sprouting changes some of the carbohydrates in the grain to a simpler sugar, which is then used by the fermenting yeast to make the alcohol in beer. So these grains, even though they have some of the goodness steeped out of them, are still a good source of protein and carbohydrates and the chickens go wild for them. I even gave a small amount to the chicks, and, surprise, they emptied the bowl in no time flat! ( they will probably all be poopy tomorrow and it will be my fault! ha!) All this tells me that animals, given a choice, will always opt for "real food" rather than processed pellets. My big hens get organic pellets, because for this winter, that's my only option. But, every morning, I take them out some of the wheat grass and other spouted seeds I keep going in the house, plus any leftover lettuce or kale or other greens from the kitchen. They run to eat the "real food" first. Maybe there is a lesson in there for us human folks.
THOSE CUTE CHICKS.
Today is Day 5 of the Chick Flicks. Steve says he thinks the chicks have doubled in size. I am happy to report that the little rooster, Frank, seems better today, more lively, and eating better. He is still smaller than his flock mates, which makes me wonder if he is a "he" at all. In about a week, I will have a really good idea if the person who sexed our new chicks at the hatchery was accurate or not. I will tell you my secret method of telling roosters from pullets then. The "chicken sexer" at the hatchery has to be pretty good, as it is not always easy to tell with brand new chicks. You can expect about a 10% error rate, but even that is pretty darn accurate. It's a good thing they don't hire me for that job! But then, wouldn't it be great party conversation when somebody asks what you do for a living. "Oh, I'm a chicken sexer"......
So, here is Day 5, short and sweet. those little buggers were only pretending to be asleep.
Turkeys were back today. They didnt seem to mind the weather. Or they are just SO HUNGRY....
Well, nobody wants to be outside today. Freezing Rain and Sleet, everything is turning to ice and it is barely above freezing. I put on the crampons to go collect sap. There was about 5 and a half gallons I think. Overall, I am getting much less sap than I figured. Several of the taps are sort of "duds" while a few others go like gangbusters. It is still early in the season, so maybe things will pick up. At this rate, I think one gallon of finished syrup is about what I can expect to net. And funny thing, now that the deep snow cover is starting to melt, my buckets seems to be getting higher and higher. :-) We are talking about taking one of the "duds" out, and drilling a tap in another tree to try that.
I have been doing a lot of reading and studying and trying to get a handle on exactly how much of what I should plant in order to have enough to eat and preserve till next garden season. This is of course, going to vary from family to family, but I did come across some good calculations that can serve as a jumping off point. This year, I am having to hold down my expectations because we are starting from scratch, and I really don't know yet even how good the soil is, and we will not get an early start, so I will miss most of the real early plantings. But, we have to start somewhere, right?
This year, as I've mentioned before, I set the goal to be onion independent. That means planting and harvesting enough onions to take us through next years harvest. Honestly, I dont know if I can do it.
This used to be the norm, you know. This is what people did. They planned and planted enough to feed their family all year. Canning, freezing, drying, and pickling, some fermenting, and root cellar storage were methods used to store and preserve the food to last the year. When I read about the quantities needed it is rather mind boggling. The list below suggested 60 pea plants per person! (way high I think) But only 80 onions per person. (way low for us). So, I think what you'll have to do first is this:
Take stock of what you are BUYING weekly now at the grocery store. Do you use 5 pound of potatoes a week? Or does that 5 pounds last you two weeks, or maybe you use 10 pounds a week... Do you eat spinach every day? How about carrots? How often do you use tomato sauce for cooking? these are the kind of questions I will be asking myself.
Multiply that amount by 52 weeks. That will be goal harvest of that particular vegetable.
For example, using onions again, I use at least one onion a day. right there, that's 365 onions, but, of course, crops may fail, the onions might not bulb up and be small so that I need to use two instead of one, and, some will not last in storage. So, I am figuring almost double that amount to compensate for those things.
For things you cannot store, such as lettuce, you will want to plant many succession crops to keep them going as long as possible, plus, use some kind of season extender like a hoop house, greenhouse, or cold frame. Winter greens will need to be of the canned or frozen variety if they come from your garden.
While this might be an over-simplification, it is, as I mentioned, a good place to start. You will have to tweak this list to suit what you and your family actually eat. If you hate beets, but love broccoli, adjust the numbers accordingly. I found several websites with good information, but what I liked about this list is that it gives you the number of plants, rather than the number of square feet of garden space, or row feet, or pounds of harvested fruit. This just seems an easier way to look at it.
This list came from a great website The Well Fed Homestead. Keep in mind that this list assumes you will be canning or freezing or dehydrating the surplus, and using all the storage techniques possible to keep the food throughout the winter and early spring. Also keep in mind that these quantities are PER PERSON - but they might vary depending on whether you are feeding small children vs. hungry teenagers.
Beans, Lima10-20 plants per person ( I would likely substitute some kind of shelled bean, like pinto)
Beans, Pole10-20 plants per person
Beets10-20 plants per person
Broccoli5-10 plants per person ( 20 brocolli plants isn't as much as you might think.. you only get one big crown from each, and then some side sprouts.... These freeze well)
Brussels Sprouts2-8 plants per person ( I would go for the lower total here)
Cabbage3-10 plants per person (this is way low. I think one cabbage a week from Oct. - May is about what we would want... 32 for storing and fermenting, and more for eating fresh, so about 50 plants total for the two of us)
Carrots10-40 plants per person (this is also way low for us. 40 plants is only 40 carrots... I would eat that many in a month, easy, all by myself, so this will have to increase greatly for us. But I interplant carrots in all the empty spaces and around other plants all throughout the garden year.. they love tomatoes, you know)
Cauliflower3-5 plants per person (I would like to plant more, but these are hard to grow, and I won't commit that much garden space to such an uncertainty)
Celeriac1-5 plants per person ( I might just start with celery for this year and skip the celeriac)
Celery3-8 plants per person (this is another one that needs to be much higher for us. I love celery)
Corn12-40 plants per person (this is a tough one. We may plant the corn for animal feed more than for us, and use it as support for the pole beans. Interplanting in this way mimics the natural way plants grow , and benefits both species)
Cucumbers3-5 plants per person (this seems about right, if I want to make lots of pickles. but DO I want to make lots of pickles???? )
Eggplant1 plant per person, plus 2-3 extra per family (maybe, at least 2 i think..)
Kale1 5’ row per person (we will need more kale, but it can grow in several successions, and I will mix other cold hardy greens as well, like turnip, mustard, chard, etc. Being plant based, we eat many more green than probably most people)
Lettuce10-12 plants per person (not nearly enough for us, not even close I will have several varieties of lettuce.. some leaf lettuce which is "cut and come again", and then the romaine, which we will allow to head up for that nice crunch)
Melons2-6 plants per person (melons are hard to grow here, I probably won't even bother)
Onions40-80 plants per person (we have already discussed this one)
Peas25-60 plants per person (really? WHO EATS THAT MANY PEAS?????????)
Peppers5-6 plants per person (we will need more, much more. Not just for fresh eating, but making nacho slices, and chili powder, and salsa, and pico de gallo and dehydrating for winter soups) More more more.... hot peppers, sweet peppers.. more more more - I do love peppers. :-) I have already started some seeds, and have about 15 pots. And I am not done.
Potatoes10-30 plants per person (this might be close, depending on what the crop produces... but i think I would err on a few more for storage)
Pumpkins1 plant per person ( 2 pumpkin plants, if I plant them right on the compost pile, can give us plenty of pumpkins most likely)
Rhubarb2-3 crowns per person (well, this is a perennial that wouldn't go right in the garden space anyway, so I'm not counting it)
Spinach10-20 plants per person (not enough, not nearly enough - we do eat spinach daily)
Summer Squash2-4 plants per person ( I can tell this figure assumes lots of freezing zucchini and having some to leave on your neighbor's doorsteps and run )
Winter Squash2 plants per person (this one is low. Winter squash is one of the best storage vegetables, good calories, ... I would go much higher on this one. Besides, I have several new varieties to try.)
Sweet Potatoes5 plants per person (sigh, if only they would grow here... maybe if we get the greenhouse)
Tomatoes2-5 plants per person ( this seems low too. I need tomato sauce, canned tomatoes, dried tomates, fresh tomatoes, salsa!)
There are more greens that we will want to plant. I gotta have Swiss Chard, and Collards... and this doesn't even begin to mention all the herbs... parsley, cilantro, basil, oregano, thyme, dill..... But, as I said, this is a jumping off place and you can start with this and make your plans accordingly.
I'm not sure I have enough available garden space this year to accommodate everything I will want to plant. Though I would love to have everything in place right away, this is a process. It might take several years to get the systems and garden space in place. Or a lifetime. I better be patient. So, what I might do is pick a couple of these items, and focus on harvesting enough of those. It will probably be the storage vegetables, like beans, squash, carrots, and potatoes (and of course onions).
And here is Day 4 of the Chick Flicks.
also, the chick and the egg. Can you see a difference yet? Just remembering that she came out of that size egg only a week ago... I guess they are gaining weight at a rate of like 10 or more percent a day. That would be like a 150 pound adult gaining 15 pounds a day. Does that put it in perspective?